Now that I’ve got this wild hair up my ass, it’s time for everyone’s favorite part of every project ever – planning!
I guess that’s not true. I mean, obviously I didn’t mean for it to be true because I was being sarcastic, but even with sarcasm that’s not true. Everyone’s ‘favorite’ part is the cleanup. Cleaning sucks way worse because you think you’re done. You want to be done. You did all the fun part, it’s not your fault there’s half a cake on the table and party streamers everywhere. I mean, I guess it’s your fault. Because it was your party. And you made that cake. And put up those streamers, even though your sister-in-law totally thinks you’re too old for streamers at a birthday party, well, guess what, Deborah, it’s my fucking birthday and I’ll have a dinosaur themed party with dinosaur print streamers if I fucking want to. Eat your cake, Debbie. Eat it all up.
Anyway, it’s time to plan how I’m going to make a Horizon Zero Dawn blanket.
First Thing We Need: The Map
They’re all over the internet, that part wasn’t hard.

For anyone who hasn’t played Horizon Zero Dawn before, and is so far out of the gaming loop you are perhaps only hearing about it for the first time here, one neat part of the game are the locations. The game takes place in what was once the United States. Not just a US analogue, like in Red Dead Redemption and its sequel, but actual America, specifically Colorado and Utah. The DLC Frozen Wilds stretches up into Wyoming and Montana. I mean, the borders are nebulous and no one actually uses these place names. But take a look:
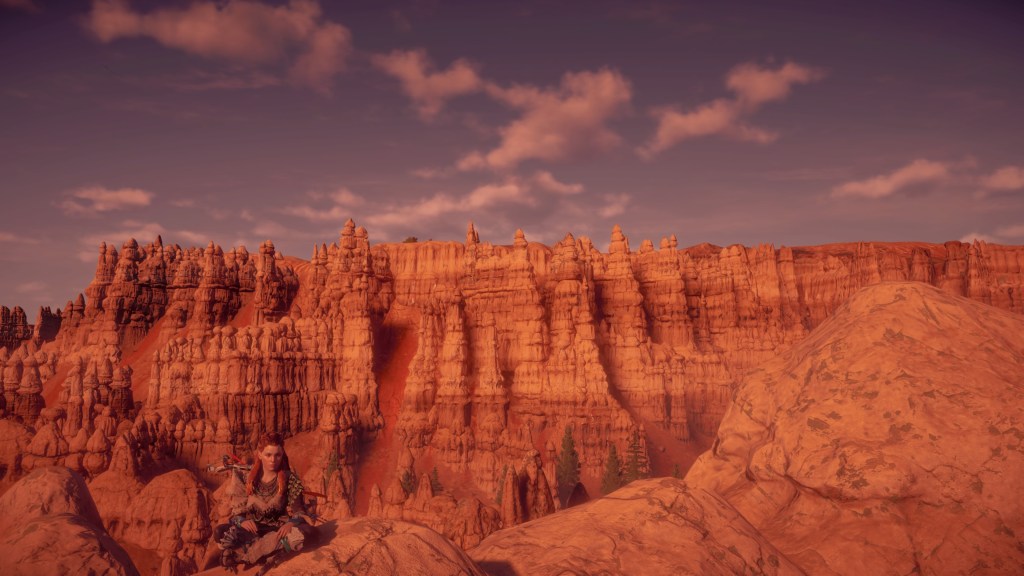
Bryce Canyon 
Fragile Arch 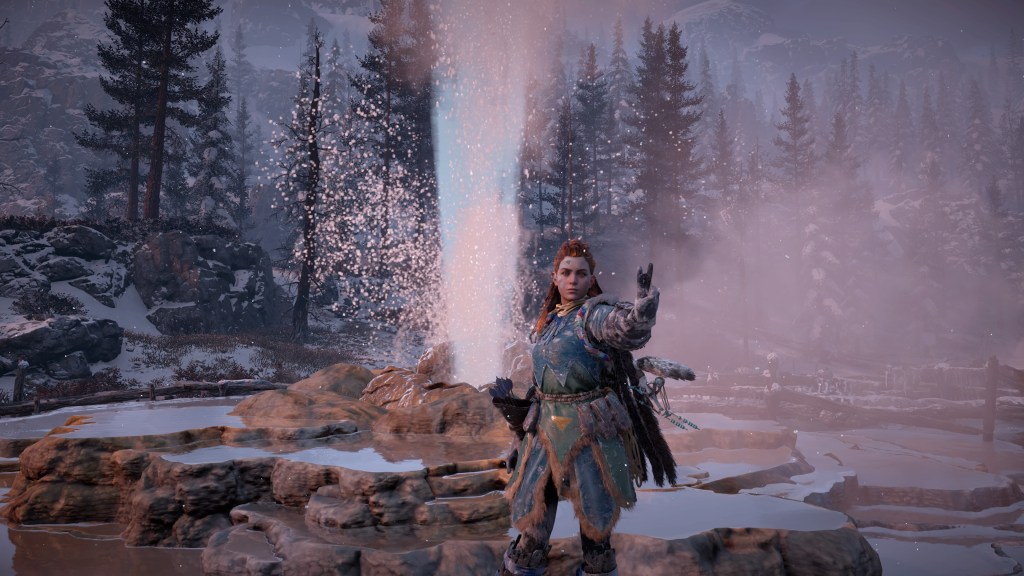
Old Faithful
These are all pictures taken by me, in-game. Horizon Zero Dawn is the first game I personally played with a dedicated photo mode, and I am so happy to see more games including one because why not why the hell not? You’re essentially setting yourself up for free advertising by your most loyal players who will sometimes play just to take pictures. I’m not even going to deny that I am one of those people.
Red Dead Redemption 2 
DEATH STRANDING 
STAR WARS Jedi: Fallen Order™
We Were Talking About the Map
Okay, so I found a good map online to work with, now it’s time to break it down into squares. There’s probably a really easy way to do this in software like Photoshop, but I don’t own Photoshop and even if I did I don’t know what I’m doing. So, that really only left me one avenue. That’s right. Your friend and mine. The one and only Microsoft Paint.
What I ended up doing here is super simple, but also super tedious. The first thing I tried was splitting the map down the middle (based on the pixel count) and splitting those halves down the middle and so on. I got to sixteen squares across and everything was slightly too big, and going another time would make everything too small. I want enough squares so there’s obvious boundaries without the blanket being twenty feet long. So I erased all of my hard work (a ‘kill your darlings’ moment, in a way) and started again. I decided twenty across would be the right size, so I divided the pixel count across by twenty and made lines one by one across and down until I ended up with my working grid.
I’m sure everyone out there who knows how to use actual programs for this are just grinding their teeth and, like, breaking their mechanical pencils in half. I know, okay. I know. This took me over half an hour, you think I’m happy with myself? Of course not. But we work with what we have and that part is over now. It’s over. You can rest.
Anyway, once I had my map in a grid, it was time to break up the territories! Now, I did have to reference a couple of different websites for a few of the muddier borders, but, to be honest, I’ve played this game so much I had most of it down from memory.

I also had to take some artistic license with the locations of the tribes. Strictly speaking, the tribes with actual territory on the main game map are the Nora, the Carja, and the Shadow Carja. The Oseram primarily live in a territory they call The Claim that would be north of Carja territory, probably whatever’s left of Idaho. The game makers at one point intended to have players go north to The Claim but this was scrapped. You do get to see some of the Banuk’s territory, called The Cut, in the DLC The Frozen Wilds, and the Banuk you meet talk of territory even further north called Ban-Ur, described in game as ‘the most uncomfortable place in the world.’ The Cut very obviously includes the remains of Yellowstone National Park locations from both Wyoming and Montana, so I have to imagine ‘the most uncomfortable place in the world’ is just Canada.
Both tribes have made pushes into the territory in the main map, though. The Banuk are sort of wanderers and you can find them in the north part of Nora territory, and the Oseram have actually put down two settlements in Carja territory, Pitchcliff and Free Heap, just south of where the entrance to the Claim was supposed to be, so I’ve just given them these areas. I also cut into the black border of the blanket to represent the edge of The Cut. I couldn’t include that whole area without the whole thing turning into one of those blankets that’s always in the movies. You know, where it’s long enough on one side to cover up the woman’s breasts but short enough on the other so you can see the dude’s glistening abs.
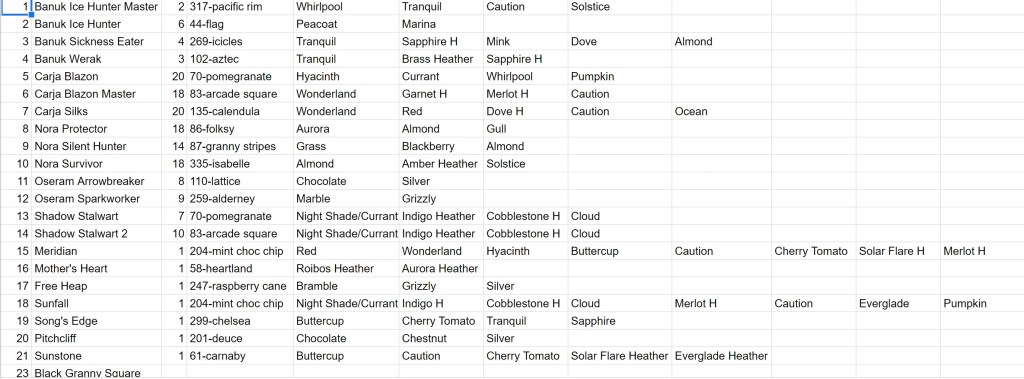
Finally, I wanted special squares to represent the most important settlements in the game: Mother’s Heart in Nora territory, Song’s Edge in the Banuk, Free Heap and Pitchcliff with the Oseram, Meridian and Sunstone in Carja territory, and Sunfall in the west with the Shadow Carja. By ‘most important’ I also mean ‘settlements I particularly enjoyed and could find a good pattern for.’ I thought about putting in squares for some of the other locations, side missions, and collectibles, but there is just so much to do in this game putting all of that in would just completely overcrowd the blanket.

Picking the Squares
I’ll get into why I picked the squares I did for each tribe as I go, so this is just the ‘how.’ To start, I did what I always do when I’m ready to try something new: I bought a book. Namely, the Nook version of The Big Book of Granny Squares (note from the future: I do not recommend this book. It was not proofread and there are a lot of mistakes). The only negative review on it was that it had a lot of squares the reviewer had already seen. Well, I haven’t seen any squares before, so this sounded perfect. I went through every pattern in the book and marked the ones I thought would work for each tribe, and whittled it down from there.
I then went to knitpicks (also not a sponsor), specifically their Wool of the Andes worsted collection (seriously not a sponsor I have no sponsors I am free), because it comes in so many colors I can’t stand it. This, incidentally, was the same type of yarn my cat Louis (she is a sponsor, actually) tried to kill herself on a few weeks ago. Specifically the Opal Heather.

Once I had picked my squares and my colors, my charts looked like this:

I had initially planned on doing something super plain for the 22 squares, the ones that will make up the border. I decided to do ‘black-out’ versions of the patterns in the main part of the squares, partly to practice the squares before doing color changes and partly to give it a little spice around the edges without being too flashy.
And with that, it is FINALLY time to order some yarn and get my hook. I’ve decided to go about making the blanket in order with the game, so next time we’ll talk about the Nora and how they’re mostly stuck-up, dogmatic bitches.
